Wondering what happens during a flooring installation? This guide walks you through each step, from initial consultation to final walkthrough, so you know exactly what to expect.
Most flooring projects begin with an in-home consultation. This isn’t just a sales pitch. We need to see your space in person to give you accurate information.
During this visit, we’ll measure each room, check your existing floors, and look at what’s underneath. Things like uneven subfloors or moisture issues are easier to catch early than after materials are ordered. This is also when we talk through your options and you can see samples in your actual lighting, which matters more than you’d think.
The consultation helps determine your project’s budget and timeline. We’ll tell you about any potential problems we spot and what those might mean for the work ahead.
Accurate measurements aren’t just about ordering the right amount of material. They’re about understanding how your space works and what challenges might come up during installation.
We measure more than square footage. We look at doorways, transitions between rooms, irregular corners, and built-in features like fireplaces or cabinets. All of these affect how the flooring gets installed and how much material you’ll actually need. We recommend ordering 5-10% extra to account for cuts, waste, and future repairs.
This is also when we’ll discuss your subfloor. If you’re on a concrete slab, certain installation methods work better than others. If you have wood subfloors, we check whether they’re level and in good condition. Subfloor problems don’t go away when you cover them with new flooring. They get worse. We address these issues before they become your problem.
The planning stage also covers logistics. We’ll talk about when materials will arrive, how long installation will take, and what you need to do to prepare. If you’re installing hardwood, for example, the wood needs to sit in your home for several days before installation begins. This acclimation period lets the wood adjust to your home’s temperature and humidity so it doesn’t warp or gap after it’s installed.
You should walk away from this stage knowing exactly what to expect, what it will cost, and when the work will happen. If any of that feels unclear, ask more questions. Transparency at this point saves headaches later.
Once you’ve scheduled installation, preparation becomes your job. The amount of work depends on what we’ve agreed to, but there are some common steps.
Furniture needs to move. We include furniture moving in our service for most projects, but you’ll still need to clear out smaller items, breakables, wall decor, and anything fragile or valuable. Installation generates dust and activity. Protect what matters.
If you have pets or young children, plan for installation day. The noise, open doors, and unfamiliar people can stress animals out. Kids underfoot slow down the work. Consider arranging for them to be elsewhere, at least during the heaviest work periods.
Clear the installation area completely. That means closets, too. We need access to every inch of floor space, and obstacles slow us down. The faster we can work, the sooner you get your home back.
You might also need to disconnect appliances if you’re doing kitchen or laundry room floors. Gas appliances should be handled by professionals if you’re not confident doing it yourself. Check whether doors will still open and close properly once the new flooring is in, especially if you’re adding height with underlayment or thicker materials.
Think of preparation as an investment in a smoother process. The more you handle upfront, the fewer delays you’ll face once work begins.
Want live answers?
Connect with a American Dream Floor expert for fast, friendly support.
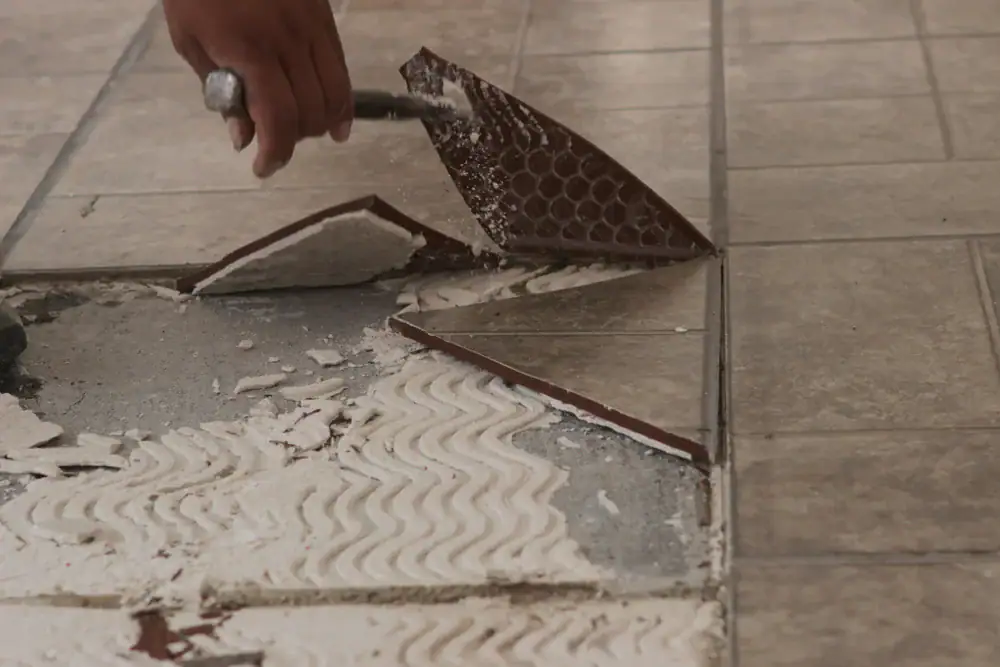
Installation day starts with removal. If you have existing flooring, it has to come out first. How long this takes depends on what you’re removing. Carpet pulls up relatively quickly. Tile and old hardwood take longer, especially if they’re glued and nailed down.
Once the old flooring is gone, the subfloor gets inspected. This is where surprises sometimes happen. We might find damage, moisture issues, or areas that aren’t level. If we do, we’ll stop and talk to you about what needs fixing and what that means for your timeline and budget. It’s frustrating, but it’s better to address problems now than after your new floor is installed.
Timelines vary based on the type of flooring, the size of your space, and whether any issues come up. Here’s what’s typical for professional installation.
Carpet is usually the fastest. Most carpet installations finish in one to two days for average-sized rooms. The process involves laying padding, cutting and stretching carpet into place, and securing edges. It’s straightforward unless your space has a complicated layout.
Vinyl plank and laminate flooring install quickly too, often wrapping up in one to three days. These materials use click-together systems that don’t require glue or nails, which speeds things up. The main time investment goes into cutting pieces to fit around edges and obstacles.
Hardwood takes longer. Solid hardwood needs to acclimate to your home for five to ten days before installation even starts. Once it’s ready, installation typically takes three to five days depending on the size of the area and complexity of the layout. Prefinished hardwood is faster because it’s ready to walk on immediately. Unfinished hardwood adds several more days for sanding, staining, and sealing.
Tile installation runs three to six days for most projects. Tile requires careful alignment, mortar setting time, and grout application. Intricate patterns or detailed designs increase the timeline. You also need to stay off tile floors while the mortar and grout cure, which can add a day or two before the space is fully usable.
Professional crews typically cover 750 to 1,000 square feet per day with a two-person team. Larger spaces take more time, but efficiency often improves on bigger projects. Smaller rooms or areas with lots of cuts and transitions slow things down.
Keep in mind these are estimates. Unexpected subfloor repairs, material delays, or complex layouts can extend timelines. We give you a realistic schedule upfront and communicate quickly if anything changes.
After the old flooring is removed and the subfloor is prepped, the actual installation begins. Each flooring type has its own process, but some steps are universal.
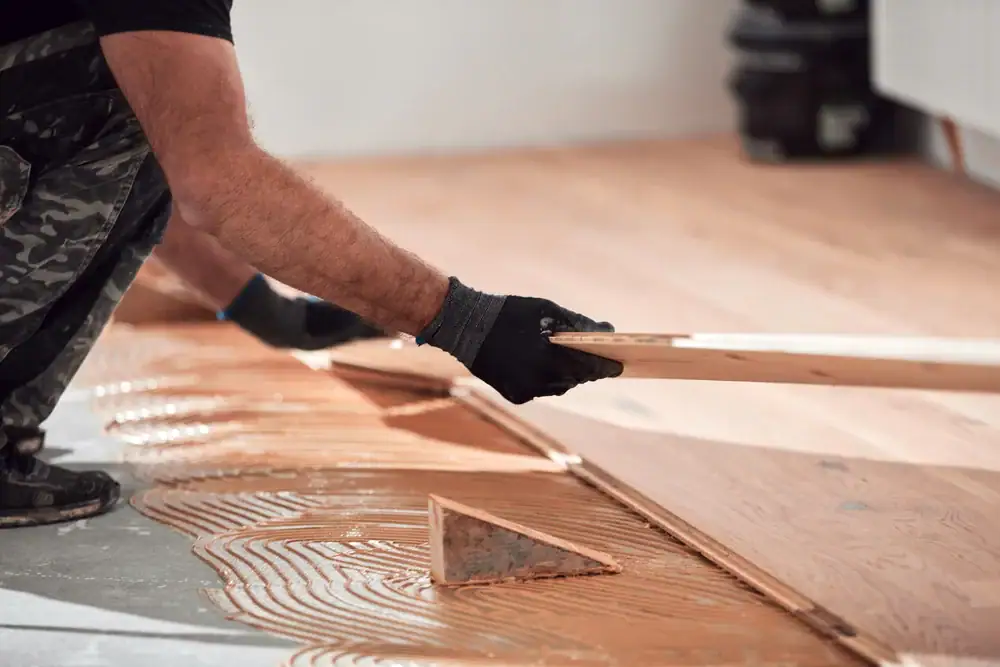
Underlayment often goes down first. This thin layer of material sits between your subfloor and your new floor. It provides cushioning, reduces noise, adds insulation, and helps your floor last longer. Some flooring materials come with attached underlayment. Others require it to be installed separately. Either way, it’s not a step to skip.
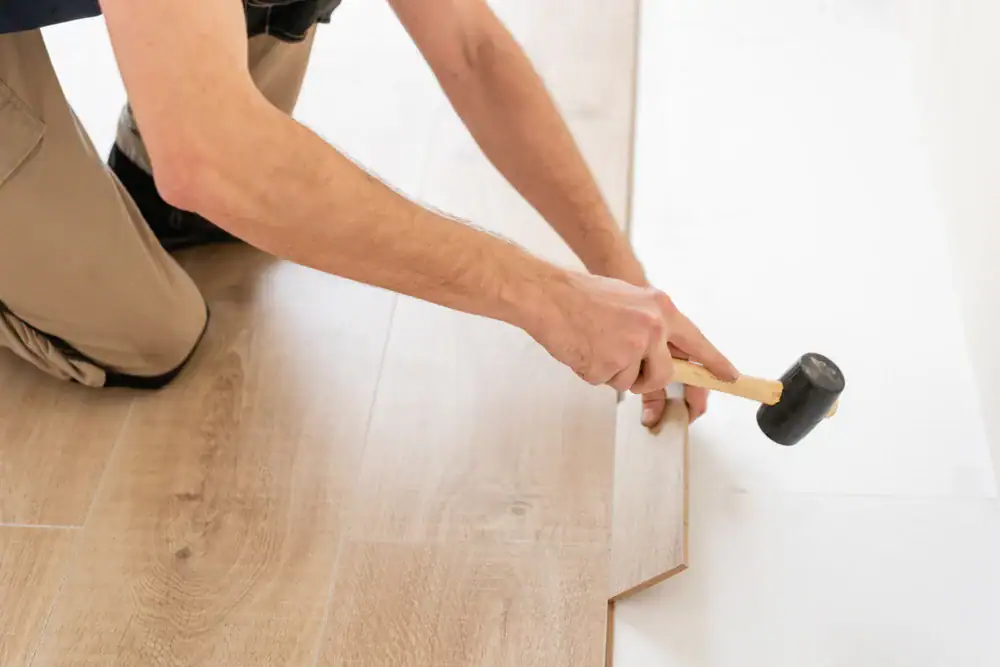
The new flooring goes in next. For hardwood, we typically start along the longest, straightest wall and work across the room. Each plank gets nailed, stapled, or glued down depending on the installation method and subfloor type. We leave small expansion gaps around the perimeter because wood naturally expands and contracts with temperature and humidity changes.
Vinyl and laminate installations follow similar patterns. Planks click together and float over the underlayment without being attached to the subfloor. This makes installation faster and allows the floor to move slightly as conditions change.
Tile installation is more involved. Each tile gets set in mortar, positioned carefully to maintain consistent spacing, and leveled to create a smooth surface. Once the mortar sets, grout fills the spaces between tiles. The grout needs time to cure before you can walk on the floor or expose it to moisture.
Carpet installation involves laying padding first, then cutting carpet to fit the room, stretching it tight, and securing it along the edges. Seams get carefully matched so they’re barely visible.
Throughout installation, our crews manage dust, protect adjacent areas, and keep the work site as organized as possible. We treat your home with respect, contain messes, and clean up thoroughly at the end of each day.
Finishing touches come last. Baseboards get reinstalled or replaced. Transition strips cover the gaps between different flooring types or rooms. Thresholds get secured in doorways. These details complete the look and protect the edges of your new floor.
Understanding the flooring installation process doesn’t just help you plan. It gives you confidence. You know what questions to ask, what to prepare for, and what to expect at each stage. That clarity reduces stress and helps your project go smoothly.
The key is working with installers who communicate clearly, show up when they say they will, and treat your home like it matters. Transparency about timelines, costs, and potential issues should be standard, not a bonus. When you find a team that operates that way, the installation process becomes manageable instead of overwhelming.
If you’re planning a flooring project in Wake County, NC or Horry County, SC and want a team that walks you through every step, we’ve been doing this for over 25 years at American Dream Flooring And Tile. We’ll help you understand exactly what to expect from start to finish.
Summary:
Article details:
Share: